Tuesday, September 21, 2010

The "Whoopsie" Pie

You may think because I post delicious looking things on this blog that I am now a seasoned cook and I really know what I'm doing. Guess again. This blog isn't called the Honest Chef for nothing. Last weekend I really messed up. You know those chocolate chip cookies? That everyone loves and always asks me to bring to things? Yes, friends, I messed those up. I have made them probably 100 times. I hope this makes you feel better about messing up in your own kitchen. I hope you aren't laughing at my idiocy instead. Well, even if you are, I will be vindicated by the great ending to this story, so read on.

Here's what happened. I was making chocolate chip cookies for a birthday party. I put in all the ingredients, one by one, measuring, etc. I was moving right along until I got to adding the chocolate chips, where I stopped. The dough just didn't look quite right to me. It looked too firm, and frankly, not like cookie dough. It tasted ok, but I could tell something was off. And then I noticed them. The TWO EGGS were sitting there on the counter, next to the beater, looking up at me and saying, "Yep, you forgot us down here." NOOOOO. I couldn't make them all over again! I didn't have any more butter, and I had used up the last of the vanilla extract. NOOOOO. And have I mentioned how much I hate to waste ingredients?

So what did I do? Why, called my mom of course. "Oh my god Mom, I am an idiot and forgot to add the eggs to my chocolate chip cookie dough. Is there any possible thing I can make with this wrecked dough?" She replied hesitantly that I could try to make a crust for some kind of pie. She wasn't sure it would work, but she too hates to waste ingredients, so I thought I'd give it a go.

But what kind of pie? Chocolate cream, replied my husband. Perfect! The cookies were supposed to have chocolate in them anyway, plus it didn't require a long cooking time (which was good because the party time was creeping up on us). So, we put a little bit on a cookie sheet and popped it in the oven to make sure that it would taste good once it was cooked. Miraculously, it did! Actually it was really good. But then I tried to roll out the dough into a pie crust shape. Forget it. I could get it to be thin, but it kept breaking apart. At this point, I was willing to do anything to get it into the pie plate, so I took all the small rolled out pieces, and pressed them together into the pie plate. Then I threw it in the oven at 375, and kept an eye on it until it turned brown.

Once it was ready, I took it out and put it into the freezer immediately. (If you ever want to make this and you have more time though, just let it cool regularly. I was desperate to finish). While this was happening, I made the instant chocolate pudding. After the pie shell had cooled sufficiently, I poured in the pudding, and let it sit in the fridge for another ten minutes. Then I topped it whipped cream, and voila! It was finished. Too bad I didn't know how it tasted. But no matter, we at least had something to bring to the party.

Well let me just tell you, that was the best freaking chocolate cream pie ever! Take that people who were laughing at me! The crust was so rich and delicious it was just awesome! People were talking about how good it was days later. I have to say, it was my best mistake ever. Or best recovery from a mistake. (Thanks Mom!) I might actually do this on purpose again sometime soon!

So, now you know that I make mistakes on things I have made a hundred times. And you might too, but the good news is that now, if you forget eggs in your chocolate chip cookies, you'll know what to do!

*P.S. The photo is not mine. I didn't take a picture because I thought it would be terrible. But it kind of looked like this. And a blog post is boring without a picture.

Saturday, September 11, 2010

Summer Tomato Sauce


I have been getting many requests for "things to do with all the tomatoes I am getting." Some people seem to be luckier than me to have lots of tomatoes donated to them by their friends and co-workers. Maybe if this recipe is good enough you can introduce me to them.

The last days are summer are here, and so are the last fresh tomatoes of the season. So here's a simple recipe for sauce that can be made only with fresh, summer tomatoes. DO NOT, I repeat, DO NOT try this with tomatoes from the supermarket or tomatoes out of season; farmer's market or garden tomatoes are the only ones that will work. Other, than that, there really isn't too much to the sauce. Our family learned this from one of my Italian relatives who makes this sauce all the time; she doesn't realize how delicious it is compared to what we are used to!

Summer Tomato Sauce (from Alessandra, a real Italian)

5-6 BIG tomatoes from the market (or 7-8 medium ones)
1/4 cup of olive oil
3 medium cloves of garlic, whole but peeled (see below for technique)
Fresh basil, about a handful, chopped not-too-small
Salt and pepper

The first step is to peel the tomatoes. I know this is not something we usually do here in America, but I guarantee you it makes a huge difference. No one likes getting stringy bits of skin in their tomato sauce. After peeling the tomatoes, core them, and dice them up. You will have a lot of tomatoes, so make sure you have a big enough bowl to put them in because there is a lot of liquid, and it will spill all over your whole kitchen if you just the cut tomatoes on the cutting board. (Yes, this happened to me.)

Once your tomatoes are prepped, put the oil in a large skillet that can accommodate all of those tomatoes. A skillet is important to use (rather than a sauce pan) because it allows more surface area, and therefore, the sauce can cook down more quickly while maintaining the fresh tomato flavor.

Next is where you need your garlic. The best way to peel a garlic clove is to smack it with the flat side of a chef's knife. For this technique you will need: 1. A 8" chef's knife. I would not recommend trying this with a smaller knife. 2. Force. 3. Courage. Put the whole unpeeled garlic clove on a flat surface (cutting board, counter). Hold the knife so the blade is flat (rotated 90 degrees from how you hold it when you are cutting). Put the thick part of the blade onto the top of the garlic, so it is just touching it and hold the handle firmly. Then take the heel of your other hand and SMACK DOWN right on top of the garlic. You must be forceful, and hold the knife tight. This seems scary at first, but it really is not, as long as you do it with confidence (no looking away in fear or anything like that! that is how you cut yourself.) Once you've practiced a few times, you'll use this trick a lot. It is way better than sitting there for 10 minutes trying to peel it with your fingers and then your fingers get all sticky and smell like garlic for the whole day. Knife technique is better.

Heat the olive oil over medium heat, and add the garlic cloves to the oil. Saute the garlic cloves until they become fragrant and start to brown. This usually takes me about 3 minutes. If they brown right away, it's too hot, so turn it down.

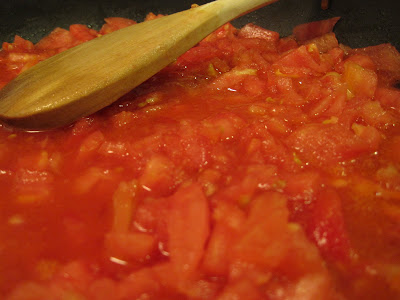
Once the garlic is ready, add all the tomatoes to the pan; keep on medium heat. Sprinkle a generous amount of salt onto the tomatoes in the skillet. Then stir once, just so all the tomatoes can get a little oil on them, press the tomatoes down so that they are in a flat layer, and do not stir anymore. Seriously. It is kind of the trick to this recipe. Leave it on medium for a while, as you see the tomato juices start to come out. This will be probably about 15-20 minutes. Do not stir.
It will look like this:

When you see the tomatoes have broken down a bit, and the liquid has been somewhat absorbed, you can turn the heat down so the sauce is just simmering. Keep it simmering for about 10-20 minutes more, until the "extra" liquid is just about cooked off. Then you add your basil, and stir lightly so that the basil is incorporated. Then 3 more minutes and it's done! Season with salt and pepper if you think it needs it. Tasting is always important. Here's the final product:


Now you're ready to add to your favorite pasta (I think it tastes great with spaghetti, fettuccine, or any of the longer pastas). You can also freeze this sauce, but I have to admit it just does not taste quite as good as it does when it is fresh.

Lots of fall recipes are coming up on the Honest Chef. But for now, enjoy the last of summer!