Thursday, March 17, 2011

Chicken Pot Pie, Simplified


Well, promises, promises. I know I promised I'd post more this year... and now it's been over two months! I guess I underestimated this working full time and going to school thing. Oh well. But I am still cooking! And finally, I remembered to take some pictures of what I made.

Today it's a variation on chicken pot pie. Usually, making chicken pot pie is the biggest hassle in the world. You have to make the crusts, then you have to make the roux that binds everything together... not only is it a lot of time, but it's a lot of butter and other stuff that's not that great for you. So, to lighten it up and make it a weeknight dish, I make chicken cobbler. I got the base recipe from Mark Bittman at the New York Times. I basically vary the ingredients depending on what I have available for veggies and proteins, and so far it's worked with everything. I especially like parsnips in it!

Chicken Cobbler


For contents:

A few tablespoons of olive oil
1 onion, chopped into longer strips (see The Great Pasta Dish (Jan '10) for cutting tips)
2 cups quartered button mushrooms
1 1/2 cups chicken broth
1 tsp of dried rosemary (or one fresh sprig
4-5 diced red bliss potatoes
2 medium carrots, cut into coins
2 boneless chicken breasts, cut into bite size pieces
1 cup frozen peas
2 tablespoons cornstarch

For topping:

1 cup flour
3/4 teaspoon baking powder
1/8 teaspoon baking soda
1/4 teaspoon salt
2 to 3 tablespoons unsalted butter, cut into bits
1 egg
1/2 cup buttermilk (Note: I never have buttermilk, and it is unnecessary to buy it for this recipe. Just warm a little milk in the microwave so it gets lukewarm. Then add a teaspoon of vinegar, stir it and wait five minutes. It will get chunky, and that's what you want.)

The trick to this recipe is just fortitude! It may look strange at certain points, but trust yourself! (And check with the pictures, too, if that helps.)

Preheat your oven to 400 degrees. Take a deep skillet (a lot of ingredients are going in there) and put a few tablespoons of olive oil in; set heat on medium. Add the onion, sprinkle with salt and pepper, and cook, stirring occasionally, until softened, about 5 minutes. Then add mushrooms and cook until liquid has released and evaporated, about 8 to 10 minutes.

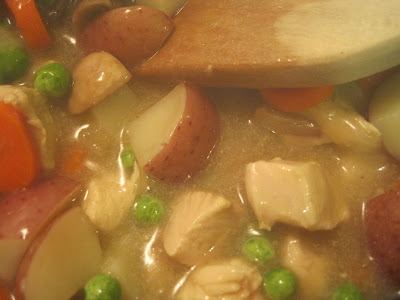
Add chicken broth and rosemary; bring to a boil, and let bubble for a minute or two, then add carrots, potatoes, and chicken and reduce heat so it simmers. This is the part where it looks wrong, but is actually right. (See photo below)I always wonder if the chicken will ever get cooked like that, but it does.


Cook until carrots are almost tender and chicken is cooked through, 8 to 10 minutes. Add more salt and pepper, then add peas and cook for about 30 seconds until the peas turn a bright green. Then just take a little of the broth (a few tablespoons), and whisk it with the cornstarch in a separate dish. Cornstarch is a thickener, and it stands in for the roux that usually is made. (This is also what ooblek is made of, if anyone cares to know). This is what will make your ingredients come together into a cobbler instead of a soup, which is what they probably look like now. Take that mixture of cornstarch and water, and add it back into your skillet. Mix it around for a few seconds until you can see it start to thicken, like so:

Then put the contents of the skillet into a casserole dish, and let it sit while you make the topping.

Put flour in a food processor with the baking powder, baking soda and salt. Add butter and process until mixture resembles small balls; don't grind it into thin air! The point is that the butter needs to be distributed throughout the mixture, but not disintegrated. Then,transfer mixture to a bowl and mix in "buttermilk" and egg until it just comes together; it should be sticky, and look pretty gross, like so:


In fact, when I looked back at these pictures, I said to myself, ew, what is that a picture of!? And then I remembered. So don't worry, it will come out delicious. Drop spoonfuls of the goopy batter on top of vegetables and chicken and smooth with a knife, covering as much surface area as possible but leaving a few gaps for steam to escape. Bake for 35 to 45 minutes until golden on top and bubbly underneath. Scoop out into bowls (better this way, so it doesn't run all over your plate) and you're ready to eat!

This is a great dish for those April Shower days, (or April Snow days like my hometown is getting tomorrow), and it's super flexible, so you can add your own personal touch to it, depending on what veggies you like.

Enjoy!

Sunday, January 23, 2011

Simple Salmon


Hello everyone. Sorry it has been so long since I've posted. Things have been a little crazy around here between the holidays and unexpected hospital visits, the blog was put on the back burner (hardy har). But today marks the start of a new year for the Honest Chef; I hope to keep up with my posts.

My husband and I have decided that this year we are going to have vegetarian one night a week, and fish another night of the week, so I had to pull out some new recipes. Fish is something that I used to hate making; I actually once caused my best friend to choke on a piece of fish because I encrusted it in about an inch of Montreal Chicken Seasoning (don't even ask why I'd be using chicken seasoning on fish). But I learned that fish doesn't really need much to make its flavor come out. The recipe I'm about to show you is super simple, and very tasty. My mom would cook this a few times a month when I was growing up and I always loved it; especially the part where she would open the foil pouch and unleash the delicious aroma. The clean up is also super easy since you can just toss the foil in the trash! It's a great weeknight dish, and you can do this with a lot of different fish (if you prefer swordfish that works, as well as other thick fish; don't try a thin white fish though).

Simple Salmon in Foil

1 large filet of salmon, or several smaller cuts of the filet
1 large clove of garlic, minced
1 tsp of dill (dried) [if you want to use fresh, use about half of that)
Juice of half a lemon
1 1/2-2 Tbsp of olive oil
1/2 tsp salt
1/2 tsp of pepper
(reserve the other half of the lemon for serving)
1 large sheet of tin foil

Preheat the oven to 350. Mix together the garlic, dill lemon juice, olive oil and salt and pepper in a small bowel (use a whisk to incorporate everything well). Take a cookie sheet and put your large sheet of tin foil on top of it. Spray the foil with Pam, or drizzle some olive oil in the center, and lay the salmon skin side down on it. Pour the oil/garlic/dill/lemon mixture you previously made over the top, and spread around the entire top of the fish.


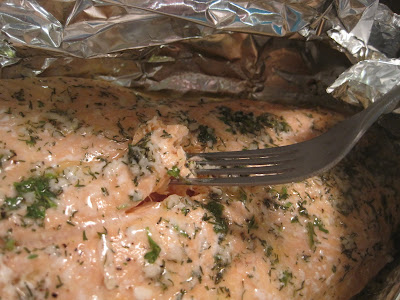
You want to let it sit in this marinade for at least five minutes, so that the fish can soak up some of the flavor. (I usually start making the rice or other side dish while it is sitting). After 5 minutes, wrap up the foil over the salmon, leaving a little space between the top of the foil and the salmon, so it has room to steam and breathe (see below).


Place the sheet into the oven in on the middle rack. The time it takes to cook your salmon has to do with the thickness of it. Typically it will take about 15-20 minutes to cook the filet, but there is a simple way to test if the fish is done... by checking on it with the fork test. When fish is done, it will "flake easily with a fork." I have seen this phrase a thousand times in cookbooks, and it seems confusing. It's actually not though. Open the fish up, and take a fork to the thickest part of the fish. Poke it in, and turn the fork; if it flakes up and the color is even, it's ready!


You'll want to check it first at about 10 minutes, then every five minutes afterward to make sure that it doesn't overcook, which can be less than tasty. Once you're satisfied with the doneness, just open up the foil, cut with a knife into portions, and serve!

I hope you try this at home so you can see how easy, and how delicious fish can be. And with such a quick clean up, maybe it will become your own resolution to eat more fish!

Tuesday, November 23, 2010

Happy Thanksgiving!

Happy Thanksgiving blog-readers!

Hope you have a wonderful day. I will be learning new tricks in the kitchen, and hopefully sharing them with you once I've worked the kinks out of them.

Eat well and remember to thank your chef, whoever it may be!

Thursday, November 18, 2010

Sloppy Joes (not from a can)


I am not here to knock Manwich in a can. It was that stuff that first turned me on to the greatness that is Sloppy Joes. Sloppy Joes are one of two things from my childhood visits to the neighbors' that I seriously thought (and still think) were (and are) some of the best things ever created to ingest, those being Sloppy Joes and Dr. Pepper. Every time I eat a Manwich or drink a Dr. P I am instantly transported to the neighbors' living room, where I frequently sat on their nice leather couch watching Price is Right. Man, that was the life. (Hi Rebecca!)

But anyway. I wanted to learn how to make Sloppy Joes, and I didn't want to have to go hunt for a can of Manwich at the very rare grocery stores that carry labels around here every time I want them. So I found a few recipes, and streamlined them all. And I finally perfected "my recipe," so I want to share it with you. It includes ingredients I always keep in my pantry, so it's pretty perfect for that cold night that you want something easy to make that will keep you warm. Kind of like tonight actually. Too bad I already had Sloppy Joes three days ago. Sigh.

Un-Canned Sloppy Joes

1-1 and a 1/2 lbs ground turkey (or beef if you can tell the difference)
A little olive oil
1 small diced onion
2 cloves of minced garlic
1/2 c ketchup
2 c tomato sauce (1 can)
1 Tbsp Worcestershire Sauce
1 Tbsp Red Wine Vinegar
2 Tbsp Brown Sugar
1/2 tsp of dried thyme
A pinch of cayenne pepper or chili powder
Salt and black pepper
plus
6 hamburger buns, toasted


You'll want a deep skillet for this, because it will need to hold all of the delicious Sloppy Joe Sauce as well as the turkey. First, brown the turkey in olive oil. You should use a wooden spoon or something hard to break it up as it cooks. Once it is cooked through, and all the liquid is cooked off (if there is still liquid and it's cooked through, you can drain the meat; this step will be necessary if you use beef) add the onions and garlic and cook for a minute or two. Turn heat down to low and add all the rest of ingredients, minus the salt and pepper. Stir everything all together and leave heat on low, so that the liquid comes to a simmer. Let simmer for about 20 minutes, stirring occasionally to make sure the heat is spread evenly. It should look like this:

Turn your oven to 350, put buns on a cookie sheet, and toast them up (about 5-7 minutes should do the trick). After the 20 minutes of simmering, taste the Sloppy Joes. If the mixture tastes vinegary still, leave to simmer another five minutes. Once the vinegar taste is gone, add salt and pepper to your liking. I usually put a few shakes of pepper, and 1/2 tsp of salt to counter the sweetness. Scoop onto buns and serve (don't forget napkins)!

Just as easy as using a can I think. The only trick is making sure the vinegar cooks off, so taste it! It's always a good rule with slow cooking things like this. Oh, and also, don't leave your buns to burn in the oven. Believe me, burnt buns do not work well with Sloppy Joes. I've tried it. Enjoy!

Sunday, November 7, 2010

Good Stuffed Chicken


Well, after that last blog, I am opting for something a little bit healthier (and more simple) for this next post. Today, stuffed chicken! I know I know, you are thinking of the bland wedding/banquet staple that no one really likes but everyone tolerates. Not so! Stuffed chicken might not seem exciting because of its bad rep, but it is! You can design it to your liking, and make it healthy and delicious. There is so much you can do with stuffed chicken, and it requires relatively little attention. All the work is in the preparation, so it is a great thing to have when guests come over. The prep work will take about 45 minutes, and the cooking about 20-30 more.

My classic stuffed chicken is filled with a mushroom stuffing. Because the base is vegetables cooked in olive oil, and there is no cheese involved, it is tasty but good for you. Here's the recipe:

Stuffed Chicken, Mushroom style

4 boneless skinless chicken breasts (cut off any fatty or gross parts around edges)

Stuffing

1/2 a carton of button mushrooms, sliced
1 small onion (or half a big one), sliced thick
1/3 c of flavored breadcrumbs (approximate, see directions: if you only have plain breadcrumbs, feel free to add your own flavorings like garlic, thyme, parsley, etc)
Olive oil
Salt and pepper

Chicken bath

1/2 of chicken broth
1 clove of thinly sliced garlic
1/2 tsp dried rosemary (or thyme)

Special Tools:
food processor, toothpicks, casserole dish

Preheat oven to 375 (you will use this later, so get it ready now.) Start by sauteing your sliced mushrooms and onions in a skillet over medium heat in some olive oil (1-2 Tbsps). You can add them at the same time. Just be sure to turn them every so often so they don't burn. Once they are cooked through (onions should be more translucent and both onion and mushroom should be soft) season with salt and pepper, and put into your food processor. While they are cooling in there, start on your chicken.

My trick for stuffed chicken is not to do that rolling up thing that some people do. I can't seem to get that right. The stuffing always comes out, and I can't properly sear the chicken because there are a hundred toothpicks sticking out in all directions. And not only that, but if you can't remember where you put the toothpicks before cooking someone is bound to get poked in the mouth, and no one likes that. So instead of that mess, I slice the side, as if I was going to cut the breast into two cutlets, but I don't cut all the way through, which creates an open pocket in there. This is much easier not only to stuff, but to keep the stuffing in (which is the part everyone wants to eat anyway). Once the pockets are ready, sprinkle salt and pepper on the breasts, and let sit while you are making the stuffing.

Back to the food processor. Now that the mushrooms and onions have cooled, pulse them until they are chopped small--each piece of mushroom or onion should be about the size of a pea. Once this happens, add in half of your breadcrumbs along with 1/2 tsp salt and a little pepper into the food processor, and pulse until incorporated. The next part is the "use your judgment part". You want this stuffing to hold together, but you also want to be moist. You achieve this by adding a little more breadcrumbs until it holds together, and then just a tad of olive oil. You are going to want to feel the texture and make sure it sticks together. Then taste it for seasoning. It should be a little on the salty side because as the stuffing cooks, some of the flavor will leach out due to the steaming in the oven.

Now for the assembly. Stuff each pocket with as much stuffing as it can hold and still be closed. Then take a toothpick or two, pull the open sides of the pockets together, and sort of "sew" the toothpick through each open flap of the chicken, so that it stays shut. Now you know that the toothpicks will be along the opening, and you hopefully won't get poked by a stray one you forgot the location of before eating. Once you have done this with each piece of chicken, heat some olive oil in a skillet over medium-high heat (you can use the same one as you used for the mushrooms if you want). Once the oil is hot, add the chicken. The goal here is to sear each side. You want nice browning on each surface, but you do not need to cook the chicken through. That's what the next step is for.

While the chicken is searing, make the bath. Take a casserole dish that will fit all the chicken in it, and pour in chicken broth. Add rosemary and sliced garlic to the broth. Also grab a piece of tin foil. When the chicken is done searing on each side, place into the broth. Cover the dish with tin foil, and put in the oven for 20-25 minutes. This will not only cook the chicken through, but infuse it with some nice flavor and moisture from the broth bath.

When you are ready to eat, just uncover and serve. You can use the "bath" for sauce if you like. This goes really nicely with white rice and some green veggies. The key tricks here are the side pocket slicing, and remembering where your toothpicks are at. Other than that, you just want to make sure that you test your mushroom stuffing for consistency and flavor, and you'll have a perfect dish every time. Feel free to put your own stuffing in there if mushrooms aren't your thing: sundried tomatoes and goat cheese, spinach feta and pine nuts-- the possibilities are endless!

Saturday, October 30, 2010

Apple Caramel Cake! Guest Blog!


Hello my fellow Honest Chef followers! Our candid culinary genius has asked me, her "Honest Eater" to take a turn at the keypad and tell you all about a new, delicious Autumn treat which we discovered this year, and which looked so good, I had to strap on the apron and take the lead. The scrumptious invention I wish to share with you today, is the Caramel Apple Cake as presented in the Food Network Magazine last month. It's a bit complicated, and it has a few different things that need to be happening simultaneously, so recruit some friends to be your sous chefs; they'll thank you later ;) Also, make sure you're not trying to cook anything else for the couple of hours you're working on this. As an experienced eater, I can say that most kitchen mistakes I see come from the chef, honest or otherwise, overextending themselves in the kitchen and letting something slip through the cracks. Just a quick note: you will notice in the pictures that we used a tube pan, with a hole in the middle, but that caused us some problems with leaking caramel, so I recommend sticking with a standard cake pan for this recipe.

Ingredients
For the Caramel and Apples:

* 4 tablespoons unsalted butter, plus more for the pan
* 3 cups sugar
* 5 tablespoons light corn syrup
* 1 cup heavy cream
* 4 large Golden Delicious apples (1 3/4 to 2 pounds)

For the Batter:

* 3 cups all-purpose flour
* 2 teaspoons baking powder
* 1/2 teaspoon baking soda
* 1 teaspoon salt
* 1/2 teaspoon ground cinnamon
* 1/2 cup sour cream
* 1/3 cup fresh orange juice
* 1 tablespoon vanilla extract
* 1 stick unsalted butter, softened
* 1 1/2 cups sugar
* 3 large eggs

Directions

Caramel
Now here are some general caramel rules (from me) before the official directions:
-Trust the ingredients and the recipe. If it says medium-high heat, use medium-high heat, not high, not medium, right in the middle of those two.
-Dark Amber is the color of a thick, syrup. Don't be afraid to let it get there.
-That being said, caramel needs attention. It should be mixed regularly and checked on almost continuously. It doesn't take long to make, but it is easy to overcook it.
-When it's time to work with it (pour it, spread it, etc.) work quickly, because it hardens as it cools and will be impossible to work with if you let it sit too long.


Butter a 9-by-3-inch round cake pan.

Make the caramel: Cook the sugar and corn syrup in a large skillet over medium-high heat, stirring occasionally, until the sugar is dissolved and the mixture is dark amber, 7 to 10 minutes.

Reduce the heat to medium. Carefully add the cream and 4 tablespoons butter (it will splatter) and cook, stirring, until combined, about 3 minutes.

Remove the skillet from the heat and let sit 1 minute. Pour 1 1/2 cups caramel into a glass measuring cup and set aside. Pour the remaining caramel into the prepared pan and set aside until set, about 30 minutes.


Apples
Some notes about the Apples:
-The recipe calls for Golden Delicious Apples which is what we used but which are not the most common. I believe that any excellent cooking apple will hold up in this recipe and taste just as good.
-If you're following along at home, you see the Caramel needs to sit for 30min. As you know, many apples brown if you leave them sitting out. Therefore, wait to cut the apples until the caramel only has about 10 more min to ensure their freshness.
-Do NOT peel the apples for this recipe.


Cut 3 apples into quarters and cut out the cores with a paring knife. Arrange the pieces skin-side down in the pan (overlapping them slightly) to form a ring about 1/2 inch from the edge. Save any pieces that do not fit for later.


Halve the remaining whole apple crosswise. Scoop out the seeds with a melon baller or measuring spoon, leaving the stem on the top half. Chop the bottom and any of the leftover quartered apples into pieces; set aside.

Arrange the apple top, stem-side down, in the center of the pan. If the quartered apples shift, just push them back into place.

Cake Batter
Notes about the Batter:
-Always remember that in baking, measurement is of the utmost importance. Please double check your teaspoons vs. tablespoons, etc. and don't get cute and do something silly like adding extra vanilla because "everyone loves Vanilla." It doesn't work like that.
-Trust the Butter and Sugar to fluff up. It took ours maybe a little longer than 5 min, but it got there eventually. It should look like a cloud.


Preheat the oven to 350 degrees F.

Make the batter: Whisk the flour, baking powder, baking soda, salt and cinnamon in a medium bowl.

In a small bowl, whisk the sour cream, orange juice and vanilla.

Using a stand mixer with the paddle attachment, beat the butter and sugar on medium-high speed until light and fluffy, about 5 minutes.

Crack the eggs into a small bowl. Slip them into the mixer bowl, one at a time, and beat until the mixture is pale and creamy, about 5 more minutes. Scrape down the bowl and beater with a rubber spatula.

With the mixer on low speed, add half of the sour cream mixture, then half of the flour mixture. Repeat. Turn off the mixer and scrape down the bowl with a rubber spatula; finish combining the batter by hand.

Spread the batter over the apples in the pan. Top with the chopped apple. Bake on the middle oven rack until the cake is brown on top and springs back when pressed, 1 hour to 1 hour 20 minutes (don't worry if the top is dark). Cool in the pan on a rack.


Bring 1 inch of water to a simmer in a skillet wide enough to hold the cake pan. Carefully run a sharp knife around the inside of the pan several times, then rest the pan in the water to soften the caramel, about 8 minutes. Remove the pan from the water and dry.

Invert a plate on top of the cake, then flip over the cake and plate. Using pot holders or a towel, wriggle the pan off (see what it should look like below).


Soften the reserved 1 1/2 cups caramel in the microwave, about 2 minutes. Drizzle the cake with some of the caramel. Slice and serve with the rest.


At a certain point it all becomes very straight forward, but good golly, it is delicious. Just look at those gooey, dripping pictures. It has all the pleasure of the great fall delicacy added to a coffee cake like base. It's fun, it's good and it will not disappoint.

p.s. for more step by step photos, you can go to the Food Network website here, and follow along. http://www.foodnetwork.com/recipes-and-cooking/caramel-apple-cake/pictures/index.html

Wednesday, October 13, 2010

Mom's Apple Crisp


Nothing says fall is here like apples! This is the first of the "Apple Series" here on the Honest Chef. Today we will be discussing apple crisp.

I love apple crisp because it reminds me of home. During the fall and winter, my mom always made apple crisp for dessert. She says she always makes it because it is easy. And this time, she was actually right (more often than not her "easy" recipes take me three hours during which I curse a lot). And let me tell you, her apple crisp is so delicious. I have had other "crisps" and "crumbles" but what makes my Mom's recipe awesome is not only that it is super easy, but that it is very sweet. In fact, I think that I inherited my sweet tooth from my mom. For example, this weekend when I was home, she was scooping spoonfuls of sugar onto her Life Cereal! Life Cereal is not cornflakes, I mean, you can see the sugar crystals on the pieces! But she likes her sugar. So do I.

The other thing I like about this crisp is that the apples really meld together and become nice and soft. The top gets really crispy and then the contrast is just awesome.

So here's the recipe. You will be super amazed at how easy and how awesome this is.

Mom's Apple Crisp

7 apples (a variety; and mom says don't use McIntosh)
1 cup brown sugar
1 cup flour
1 stick butter (softened JUST A LITTLE BIT, so it's easier to crumble)


Preheat your oven to 375. Your first step is to core, peel, and slice the apples. I have a handy gadget for this, but you can do this by hand. I like to slice my apples pretty thin, so that each slice is about 1/4 inch thick and 1 inch long. I think this really lends the apples to becoming uniformly soft underneath the crust.

The second step is to put all of these into a 9x13 glass baking dish. You will see that the apples fill it up. This is good. When you're done, they will be shrunken to about half that size.

The third step is to get a big bowl, add your brown sugar, flour and stick of butter, and mix it all up until the butter is incorporated throughout (there should be small chunks of butter through the whole thing).

Pile this mixture on top of the apples, and put in oven for about 45 minutes. The crisp should be uniformly brown on the top (see below). You should also notice that the thickness of the crisp has shrunk to half its previous size.

And you're done! See, wasn't that simple? Four ingredients and three steps. Mom was not joking when she said it was easy. And I am not joking when I say it is the best apple crisp ever.

The tricks to remember are to make sure the butter is incorporated throughout the sugar and flour mixture, and to cut your apples thin. That's it! Enjoy.