This is all in preparation to say that this week, we are going to tackle some new and semi-difficult things to make. But first, let's see what I got this week in the farm share box:

A few new things: Eggplant! Fresh onions (these things were THE BEST), a green pepper, celery (! i have never seen this ever at a farmer's market in the northeast), and two unripe green tomatoes (seriously?)
And some oldies but goodies: summer squash, potatoes, green oakleaf lettuce, mint, savory, cucumbers, rainbow swiss chard and ... carrots. I am getting a little sick of carrots.
 |
| Beet tzatziki -- so pink! |
Meal 1: Steak, onion, and pepper kebabs with brown rice plus a green oakleaf and cucumber salad with mint cucumber dressing
Used: Cucumbers, oakleaf, mint, onions, summer savory, pepper (booyah!)
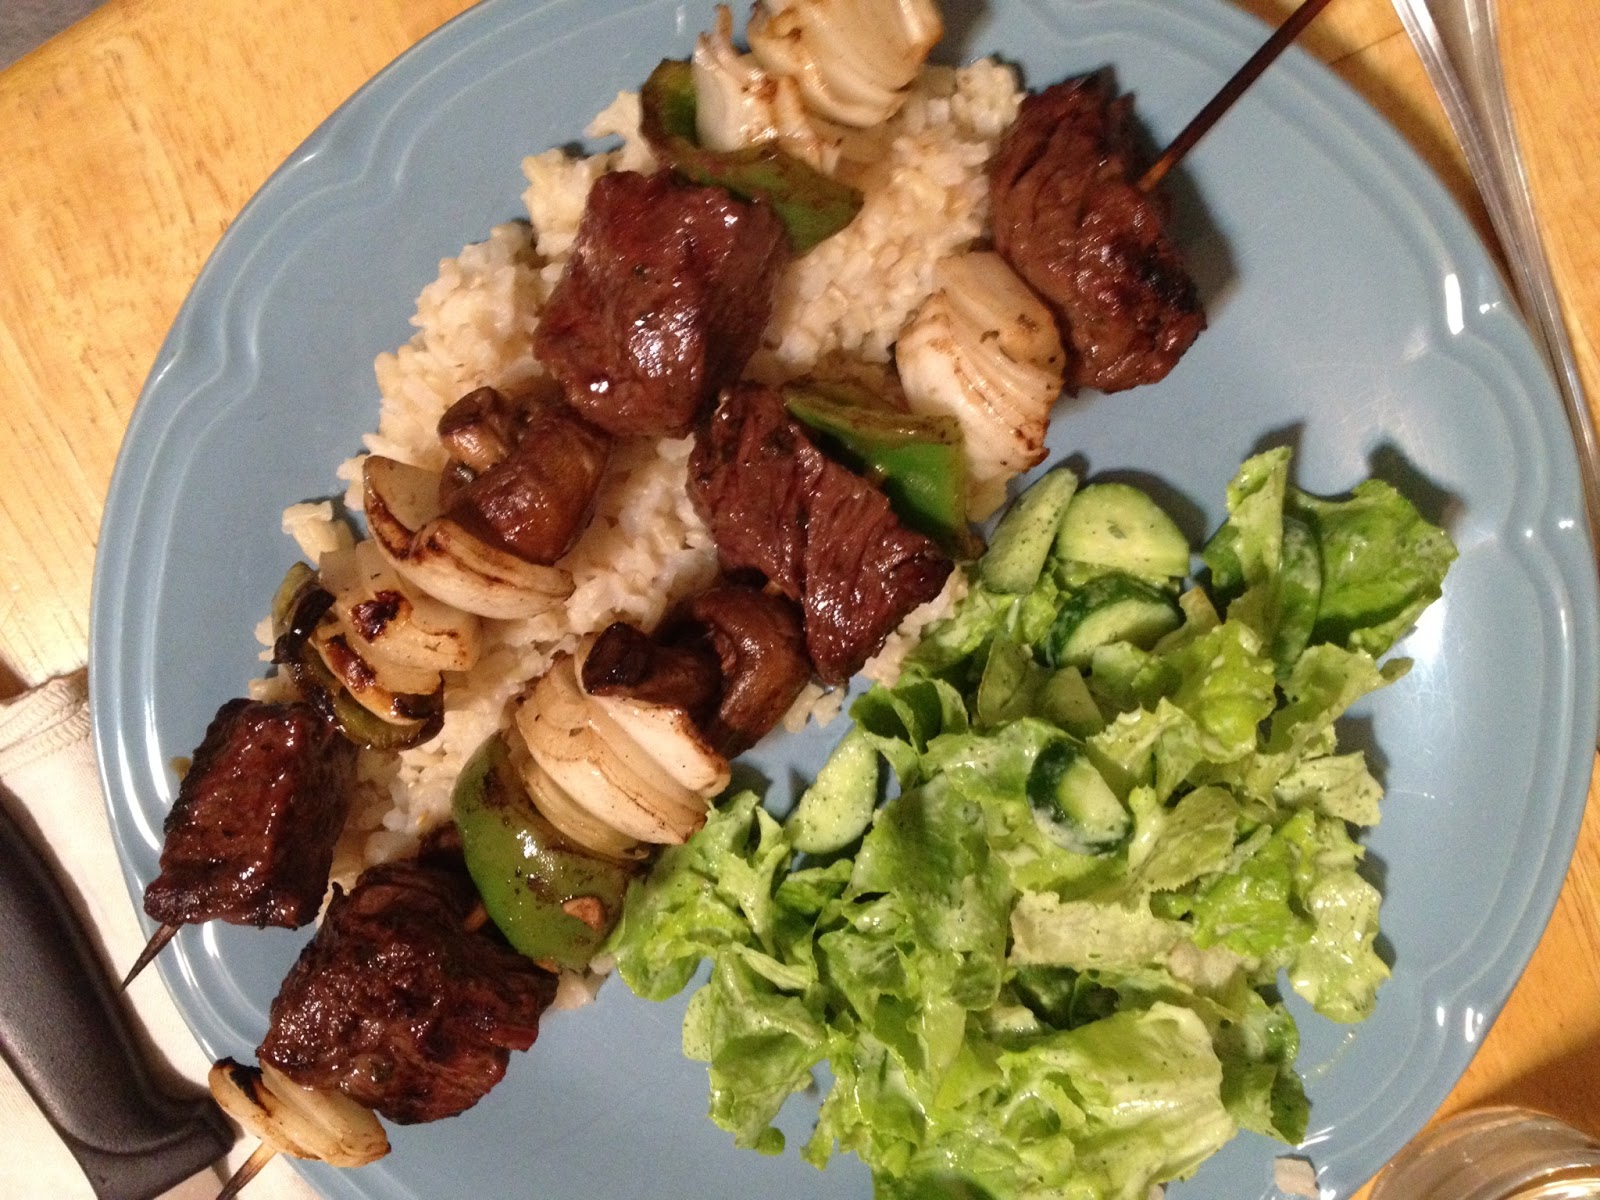 We had an awesome dinner guest on the first day -- my lovely sister in law. Said SIL cannot eat gluten. Well I bet you didn't even think about whether or not gluten is in the meal stated above. But there isn't. So put it in your GF arsenal. We have already made kebabs during this summer, week 3, and these are the same deal, but I used a little summer savory in the marinade. But before we move on from the kebabs I just want to say these onions were amazing. Literally the most delicious onions and one of the most delicious vegetables I have ever put in my mouth. You see how they have the long green stems in the picture up above? These are fresh onions. The onions we get at the store with the thin papery skin on them? Those are cured onions (learn something every day!). These fresh ones are so different and so worth picking up if you see them. Especially on the grill they were so sweet and well, just go try them.
Now for the salad dressing. This was a first for me, and not really much of a success I must admit. I forgot one thing which made a big difference -- cucumbers have a really high water content. Therefore, when I put everything to make the dressing in the blender, I added some water, because I knew my blender would not tolerate only solid things in there. However, as soon as it sucked up those cukes the water amount tripled and the dressing was really watery. Also, this didn't make a great match with the oakleaf lettuce as it was too bitter. But I think it would have been good on just sliced cukes, or as a marinade, or on a corn salad.
Cucumber Mint Dressing

1 cup plain greek yogurt
3 small cucumbers, chopped into big chunks
2 handfulls of mint leaves
1 handful of dill
A dash of Worcestershire sauce
Salt and Pepper to taste
Put all of this in the blender (cukes first) and zip it up. You might have a crappy blender that doesn't want to zip this up --- shake it around while it's running (carefully of course) and that should help it along. Here it is. Too thin, but still a pretty shade of green.
Meal 2: Sausages with Fried Green Tomatoes and Stuffed Summer Squash
Used: Summer squash, green tomatoes, swiss chard
What else am I going to make with green tomatoes, right? I mean, sure you can pickle them. But I don't have the proper stuff and let's be honest, no one would eat them but me. So fried green tomatoes it was. Obviously, these are not heart healthy, but they were actually pretty good. And better for you than frying oreos, right?
Fried Green Tomatoes

1 cup of cornmeal
1/2 cup of breadcrumbs (not panko)
1 cup flour
1 tsp of smoked paprika
1/2 cup buttermilk
1 egg
Enough canola oil to cover a 1/2 an inch up the side of your deep skillet (or peanut oil if you're hardcore)
Salt

Now you are ready to fry! Add the canola oil to the deep frying pan (1/2 up the side like I said), and heat it up on medium high. To test if it is hot enough, drop in a tiny bit of cornmeal and see if bubbles form around it immediately, or if it just sinks to the bottom and is sad. Wait until it bubbles with a drop of cornmeal, then it's ready (or if you have a thermometer (not me) the oil should be at 350). Quickly dunk each tomato slice in the flour, then the egg, then the cornmeal bowls, and then put it in the pan. Put as many in as will fit without overlapping. Then just watch for them to turn brown underneath (2 minutes should be pretty good), and then flip to the other side and cook another two minutes (or until bottom side is brown). Then, take them out and lay them on paper towels to absorb excess oil. Sprinkle a little salt on them while they are still wet from the pan.
 |
| Don't those unripe tomatoes look tasty now? |
I also made stuffed squash with the same exact stuffing I used for the chicken last week, except without the egg, mostly because I forgot to add it. They were still good. Just scoop out the seeds with a spoon (surprisingly easier than it looks), and put in the stuffing. Top with breadcrumbs and roast at 425 for 20 minutes on a cookie sheet, or until they begin to brown on top and on the sides.
Of course, had to get some meat in for Noah... and if you need to, just sautee up a chicken sausage, slice, and add to the plate.
Meal 3: Moussaka
Items used: Eggplant
Ah moussaka. Moussaka (pronounced moo-sah-KAH, not moo-SAH-kah as was once rudely pointed out to me) is one of my absolute favorite dishes of all time. For those of you that don't know, mousakka is a greek/middle eastern dish that is like lasagna, only better (don't tell my Italian fam). It uses eggplant as the layers, along with meat, tomatoes, onions, and cinnamon, which is KEY, all topped with a delicious (albeit scary at first) bechamel sauce.
Turns out, my eggplant was too tiny for a whole moussaka, but if I have an excuse to make moussaka, I am going to make it, so I had to supplement by buying another one at the grocery store. Oh well. Will I regret doing this once eggplant season is fully upon us? Probably.
Anyway, I get my recipe from a great middle eastern cookbook called the New Book of Middle Eastern Food by Claudia Roden. Here is her recipe, with my notes. We will talk more about the bechamel in a minute.
Moussaka
Ingredients:
3 eggplants (about 1 1/2 pounds) peeled and sliced thinly (she doesn't peel. I think it's better if they're peeled).
 Brush the eggplant slices generously with olive oil (both sides) and broil or grill them, turning them over once, until lightly browned. (My broiler takes about 4 minutes each but you have to watch them! They can burn up in a second. I rotate the pan around to prevent some of them from browning too fast. See left for a sample of how they should look.) Set aside.
For the meat and tomatoes:
2 onions, thinly sliced or chopped
3 T vegetable oil (canola)
1 1/2 lbs ground lamb or beef (I am sure lamb would be tasty, but I always use ground turkey and it still tastes good)
salt and pepper
2 t cinnamon (she says optional; it's not)
5 large tomatoes, peeled and chopped (Since tomatoes out of season are gross, I use one large can of peeled whole tomatoes, and then chop them up myself. You could used canned diced tomatoes too)
2 t sugar
1/2 t chili-pepper flakes
3 T chopped flat-leaf parsley (Sometimes I don't include this because I don't have it. It still works)
Fry the onions in the oil in a large skillet or saucepan until golden (medium heat with a little canola or olive oil). Add the ground meat and stir, crushing it with a fork and turning it over, until it changes color. Add salt, pepper, cinnamon if using, tomatoes, sugar, and chili flakes if you like. Stir well, and cook until the liquid has almost disappeared, then mix in the parsley.
For the white sauce topping:
4 T butter
4 T flour
2 1/2 c hot milk (skim always works for me, but the fatter the better obviously. i heat it in a pyrex measuring cup in the microwave for 1.5 minutes)
salt and pepper
pinch of grated nutmeg
2 eggs
1/2 c grated cheddar
For the white sauce topping:
4 T butter
4 T flour
2 1/2 c hot milk (skim always works for me, but the fatter the better obviously. i heat it in a pyrex measuring cup in the microwave for 1.5 minutes)
salt and pepper
pinch of grated nutmeg
2 eggs
1/2 c grated cheddar
 Prepare a white sauce: (So this is hard at first, but definitely doable. This is the first successful white sauce (bechamel) sauce that I have ever made. Her directions are very good, but I will note pieces to pay attention to to help you along.) Melt the butter in a pan (med-low heat). Add the flour and stir (she must mean whisk. Whisk it) over low heat for a few minutes, until well blended (see right). Add the hot milk a little at a time, stirring vigorously each time, until it boils, taking care not to allow lumps to form (meaning you are whisking it so they don't form). Simmer over low heat, stirring occasionally, until the sauce thickens. Add salt and pepper and a pinch of nutmeg. Beat the eggs lightly in a separate bowl, then beat in a little of the white sauce (a quarter cup or so), then pour back into the pan, beating vigorously (this is called tempering. you are doing this so your eggs get used to the heat from the small bit of sauce and don't scramble when you put them into the whole pot). Do not allow the sauce to boil again. Add the cheese and mix well until melted.
If you follow these directions exactly I promise that it will work out, and it will thicken up, and you will be amazed. If it doesn't, write me, and we'll figure out what went wrong. This is a great sauce to know how to make because it is a base for many other delicious things (read: mac and cheese). You can do it!

Then you are ready for assembly. Line the bottom of a large baking dish with half of the eggplant slices. Spread the meat on top, and cover with the remaining eggplant slices (I then cover with more of the meat, but you can put it all in the middle if you want). Pour the white sauce all over (you might have extra. You can freeze it!).
And then you'll have delicious moussaka. Did I mention this was a weekend project? Yeah, don't try to make this when you get home. Dinner will be at 10pm.
Bake, uncovered, in a preheated 400 degree Fahrenheit oven for about 45 minutes (40 minutes for me), until golden.
Meal 4: Grilled BBQ Chicken with grilled carrots, potato salad and corn
Items used: Potatoes, celery, carrots
So, I've already blogged about almost everything on this dinner plate before, except grilled chicken. I realize it is a little late in the summer to be talking about how to properly grill a boneless chicken breast, but better late than never. There are lots of misconceptions about grilling chicken, and I want to set some things straight.
1. You do not put your raw chicken onto the grill with the sauce already on it.
2. You do not put chicken on grates that have not been prepped and just pray that it doesn't stick and that it turns out to have beautiful grill marks.
3. That is all. If you follow the directions below your grilled chicken will always be delicious and it will not have burnt or "blackened" sections of carcinogens that you shouldn't be eating anyway, nevermind that those parts taste terrible.
So first. Take your boneless skinless chicken breasts, and season them with salt and pepper. Let them come to room temperature (or close) while you do other things to prepare for dinner. They don't take long to cook.
When you are ready, turn on your grill. Once that grill is heated up, take a paper towel, drizzle some olive oil (or whatever oil) on it and bring that out to the grill along with some tongs. Grasp the towel with the tongs (see below), and brush it over the grates, so that they are oiled. This will prevent the chicken (and all grilled food) from sticking to the grates, and make lovely grill marks. Then, slap the chicken down on the grates (slightly diagonal to the grates to get the best marks). Yes, you are putting the chicken on the grill with nothing more than salt and pepper on it. For now.


Then, after a few minutes (4-5) check the chicken to see if it has grill marks on it. If it looks like the photo below (left side), flip it over. Then, while the other side cooks, add the sauce to the cooked side only. Once the other side is finished cooking, flip the sauce side to the grill, and sauce the remaining side. Repeat the saucing of each side and then grilling each side for 1 minute, so the sauce congeals a bit onto the chicken. Serve with remaining sauce.


 You will have beautiful looking chicken, that is tasty and miraculously not burnt to a crisp! The secret is that BBQ sauces have a really high sugar content. If you leave said sugar in the middle of a fire for as long as it takes to make chicken not raw anymore, that sugar will burn, because sugar has a high propensity for burning. I don't know what terrible advertising executive thought up the idea of "marinating" your chicken in BBQ sauce and slapping it on the grill, but he/she has not done anyone any favors. Adding it at the end allows it to caramelize and not burn, because it only spends a few minutes over the fire. Doesn't that look appetizing?
So there we have it. Another week of veggies in my belly, and another week of recipes that will hopefully help you get some into yours. Let's check the rules before we're done.
Did I try everything? Yes, and it all was quite tasty. Did I use everything? Yes. But man am I sick of carrots. Have a good week everyone!
No comments:
Post a Comment